To begin my Lightwave project, we were asked to design and create two models for a futuristic vehicle. We could use any techniques, with any functions - as long as it didn't involve wheels. To begin the project, I first research in to different transportation methods, so that I could get an idea of the kind of thing I'd want to do for my final peice. Once this was done, I started sketching out idea's - using techniques such as combining animal traits, to come up with something unique and original.
Eventually, I settled on a design which was based partly on a boat and a hang glider - and a small craft influenced by the design of a Fly.
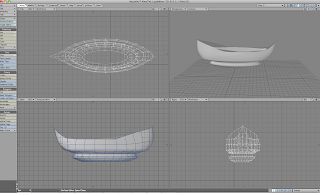
For my first design, I decided to go with the part boat, part hang glider. I began by making the base of the boat, since this would be the main structure of the design. I did this by first creating a box, and molding it in to the shape I wanted to achieve - I did this by selecting the ends of the ship, clicking the right polygons and moving each sides to make the curves. To create the move defined curves - specifically the bottom aspects - I selected the points on the polygons, then clicked on them seperately, to move them individually to mold them in to shape. I also used "smooth shift," and "move," to add more decoration and depth to the sides of the ship.

To create the ropes to connect the hang glider and the ship, I firstly created a disk - streached to a cylinder so it was similar to a long tree trunk. I then duplicated this, so I had two of the same thing on the same layer. Then I created a circle, used the slice tool to create the rings and smoothed them out so they were more circular. Taking the cylinder again, I duplicated it to add it too the bottom. Once that was complete, I added small decoration by creating a circle, squashing it together with the sizing tool, and placing them on the sides - from here, I altered the sides until everything fit together and looked correct.

Placing the suspender to the ship, I duplicated as shown in the above image - so that I now had two. I then placed them on either side of the ship and rotated them until they connected at the top ends.
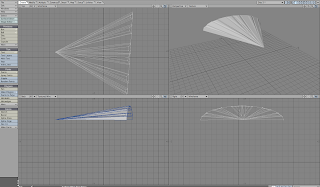
For the glider, I got a cone shape and selected specific polygons - these were the bottom parts of the structure - then I deleted them so now it had a flat surface at one end and a pointed part at the other. I then selected certain polygons on the roof and using the extrude tool, pulled them out slightly so the top had dents and ridges in it to give it more depth.
I then rotated the glider and placed it on top of the ship so it connected with the two ropes I had created earlier.

After I had the correct shape, and placement - I set about duplicating it, sizing it smaller, and placing it on top of the original. I did this three times, still making each one smaller than the next to create winged effect. Once I was satisfied of the placement and sizing, I made the whole thing bigger than the ship by streaching it.

Once the ship was complete, I added textures by saving some to my "images" folder. I then named each individual peice of the ship, so I would be able to texture them seperately. I then added them to the ship - using a wooden texture for the bottom - a red material for the glider and a metal for the attachments holding it all together.
Once this was done, I rendered it and create a small video peice to go with it.


